
Estos últimos días, mientras entrenaba en la calle, se me ha ido acercando gente a preguntarme cómo se hacen malabares, y después de enseñárselo he decidido documentar el método que uso en los talleres, que debe mucho a Òscar Dieguez, profesor de malabares de la Escola de Circ Carampa. El vídeo cubre la progresión de una pelota a tres, con GIFs animados y los patrones de siteswap correspondientes para quien quiera profundizar en la estructura de cada lanzamiento.
11 ejercicios esenciales para consolidar la cascada de 3 pelotas
El método que explico en el vídeo es el que he probado en los talleres y con personas que he conocido por el camino. Avanza paso a paso, sin saltar etapas, porque cada ejercicio prepara el cuerpo para lo que viene.
FAQs
Sobre hacer malabares con 3 pelotas
¿Cuánto se tarda en aprender a hacer malabares con 3 pelotas?
Depende de la persona y del tiempo que le dediques. Hay quien lo consolida en unos días y quien necesita semanas, y la regularidad cuenta más que las horas, porque sesiones cortas cada día avanzan más que sesiones largas y espaciadas.
¿Qué errores cometen más los principiantes?
Lanzar demasiado alto o demasiado bajo, moverse hacia delante persiguiendo las pelotas y mirarse las manos en lugar de fijar la mirada al frente. Muchos también agarran las pelotas demasiado fuerte, lo que dificulta un lanzamiento limpio.
¿Qué pelotas van mejor para empezar?
Las que no ruedan cuando caen y que tengan un peso adecuado para tu mano. Los beanbags o la BBX de Play Juggling van muy bien para los primeros pasos, y si quieres más información tienes el artículo sobre cómo elegir tu primer juego de pelotas.
¿Puedo aprender sin experiencia previa?
Sí. El primer paso es aprender a lanzar y recoger una pelota de manera limpia antes de añadir más, y ese ejercicio ya lo puedes hacer hoy, que no pide ninguna coordinación previa, solo seguir la progresión con paciencia.
Cómo hacer malabares paso a paso con GIFs y siteswaps
Cada ejercicio tiene su GIF animado y el patrón de siteswap correspondiente. Los siteswaps describen la estructura matemática de cada lanzamiento y ayudan a entender por qué cada ejercicio prepara el siguiente.
Ejercicios con una pelota, los fundamentos
Todo empieza con una sola pelota. La postura y el ritmo que establezcas aquí determinan la calidad de todo lo que viene después, los codos doblados a 90 grados, las palmas hacia arriba y la mirada al frente en lugar de en las manos.
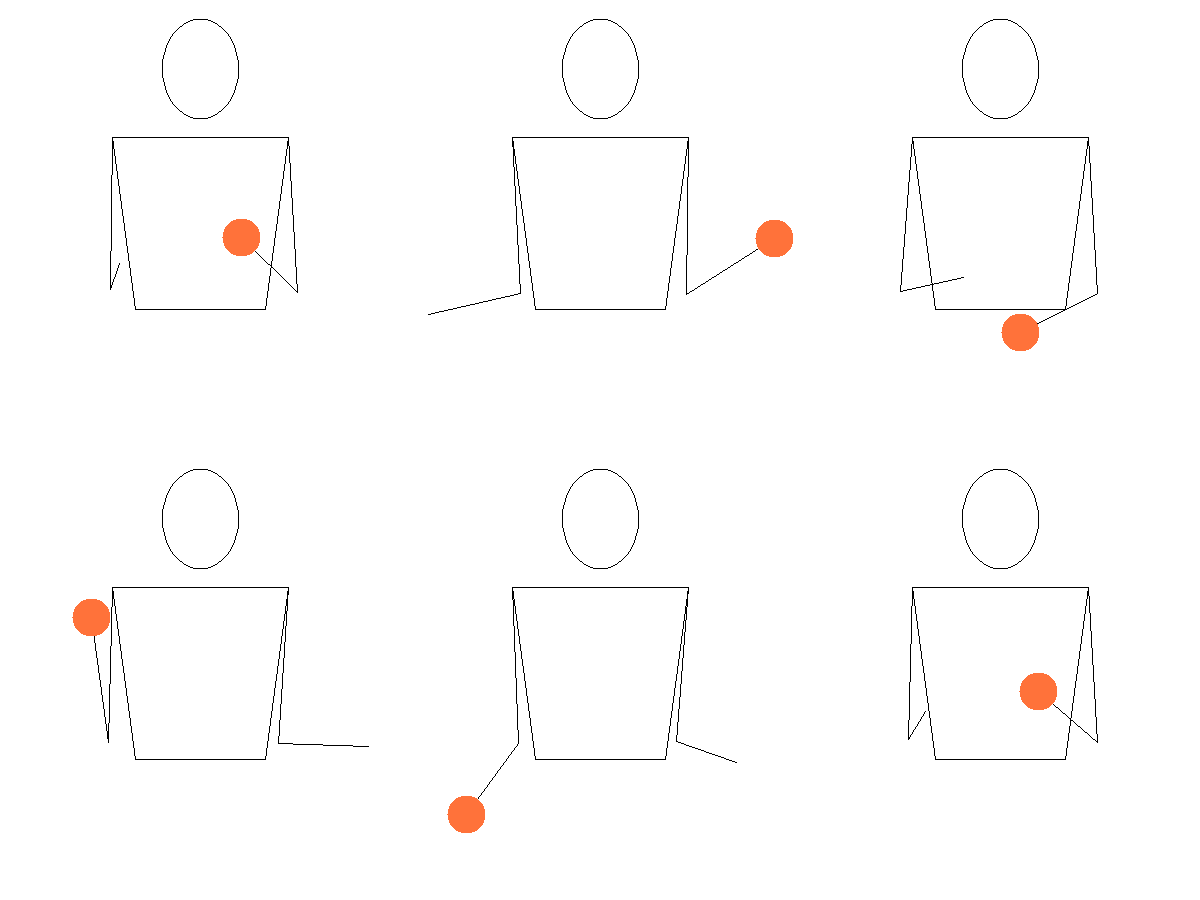

- Sujeta una sola pelota en la mano dominante, con los codos doblados a 90 grados y las palmas hacia arriba.
- Para lanzar la pelota, mueve el antebrazo hacia arriba, sin mover la muñeca ni todo el brazo.
- Mantén los codos al lado de las caderas. El lanzamiento debe llegar a la altura de los ojos en su punto máximo y debe ir inclinado para aterrizar en la palma de la mano no dominante, que espera. Cuando la recojas, deja que la pelota caiga en la mano sin ir a buscarla.
- Ajusta la posición del cuerpo si el lanzamiento te sale descentrado.
Ejercicios con 2 pelotas, las bases del intercambio
Con dos pelotas se aprende el intercambio, el momento en que las dos pelotas se cruzan, que es el movimiento fundamental de cualquier cascada.
Practica el intercambio básico con dos pelotas y luego prueba a mantener el patrón


- Coge dos pelotas de colores distintos, una en cada mano, y empieza lanzando la primera, la naranja, desde la mano dominante.
- Cuando la pelota llegue al punto más alto de la trayectoria, lanza la segunda, la amarilla, desde la mano no dominante y por debajo de la primera. Las dos trayectorias tienen que ir ajustadas al lado de la mano que las recogerá, porque si son idénticas las pelotas chocan en el aire.
- Recoge la primera pelota, la naranja, con la mano no dominante, y la segunda, la amarilla, con la dominante.
Ahora prueba a empezar con dos pelotas en una sola mano
Una vez te sientas cómodo con el intercambio en los dos lados, ya estás preparado para afrontar la cascada.
![Ejercicio con dos pelotas, siteswap [32]0320 - Cómo hacer malabares con 3 pelotas - troposfera.xyz](https://troposfera.xyz/wp-content/uploads/2022/12/2-ball-didactic-exercices2303202-how-to-juggle-3-balls-troposferaxyz.gif "Cómo hacer malabares con 3 pelotas 6")
![Ejercicio con dos pelotas, siteswap [32]0330330320 - Cómo hacer malabares con 3 pelotas - troposfera.xyz](https://troposfera.xyz/wp-content/uploads/2022/12/2-ball-didactic-exercices2303202-x-3-how-to-juggle-3-balls-troposferaxyzgifgif.gif "Cómo hacer malabares con 3 pelotas 7")
Ejercicios con 3 pelotas, ¡ya lo tenemos!
Antes de intentar mantener las 3 pelotas el máximo tiempo posible, haz solo 3 recogidas, y cuando las tengas sólidas prueba a hacer 5. Acuérdate de empezar cada vez con una mano distinta.
![Ejercicio con tres pelotas, siteswap [23]3322 - Cómo hacer malabares con 3 pelotas - troposfera.xyz](https://troposfera.xyz/wp-content/uploads/2022/12/3-ball-didactic-exercices233322-how-to-juggle-3-balls-troposferaxyz.gif "Cómo hacer malabares con 3 pelotas 8")
![Ejercicio con tres pelotas, siteswap [23]333322 - Cómo hacer malabares con 3 pelotas - troposfera.xyz](https://troposfera.xyz/wp-content/uploads/2022/12/3-ball-didactic-exercices23333322-how-to-juggle-3-balls-troposferaxyz.gif "Cómo hacer malabares con 3 pelotas 9")
Coge tres pelotas, dos en la mano dominante y una en la otra mano.
- Sujeta las dos pelotas de manera que cojas una, la naranja, con el pulgar, el índice y el dedo corazón, y la otra, la verde, con el anular y el meñique.
- Lanza la primera pelota, la naranja, desde la mano dominante.
- Como en el intercambio, lanza la segunda pelota, la amarilla, desde la mano no dominante cuando la naranja esté a la altura de los ojos.
- Recoge la naranja con la mano no dominante.
- Cuando la amarilla esté a la altura de los ojos, lanza la tercera pelota, la verde, desde la mano dominante. Es el mismo intercambio, pero en el otro lado.
- Recoge la amarilla con la mano dominante, cierra el patrón y empieza del otro lado.
Cuando tengas esto consolidado, puedes probar a añadir más lanzamientos y recogidas, como he dicho al principio de este apartado.
Todas las animaciones se han hecho con JugglingLab. Si quieres elegir las pelotas adecuadas para practicar, tienes el artículo sobre el primer juego de 3 pelotas, y si prefieres fabricarte las tuyas, aquí tienes cómo hacerlo.
Lo siento, debes estar conectado para publicar un comentario.